En este post doy una guía estructurada con el paso a paso explicando cómo conectar el WEMOS D1 con la EEPROM 24LCXX usando la librería sparkfun external eeprom.
Esta configuración te permitirá almacenar y recuperar datos de forma no volátil, ideal para configuraciones, cualquier información que deba mantenerse al apagar el dispositivo.
La EEPROM 24LCXX es una memoria no volátil I²C que permite guardar datos incluso después de apagar el microcontrolador. En este ejemplo.
- Ventajas: almacenar configuraciones, registros de sensores, contadores o eventos.
- Capacidad: 256 kbits (32 KBytes)
- Conexión I²C: fácil y rápida de integrar
Prerrequisitos
- Debe tener el entono de trabajo instalado correctamente, esto lo explico a detalle en instalar entorno trabajo Wemos D1
- Dale una leída al post EEPROM en donde explico como funciona una memoria electrónica
- Realizamos un post en donde explicamos la comunicación i2c
- Para este post trabajaremos con la librería SparkFun_External_EEPROM
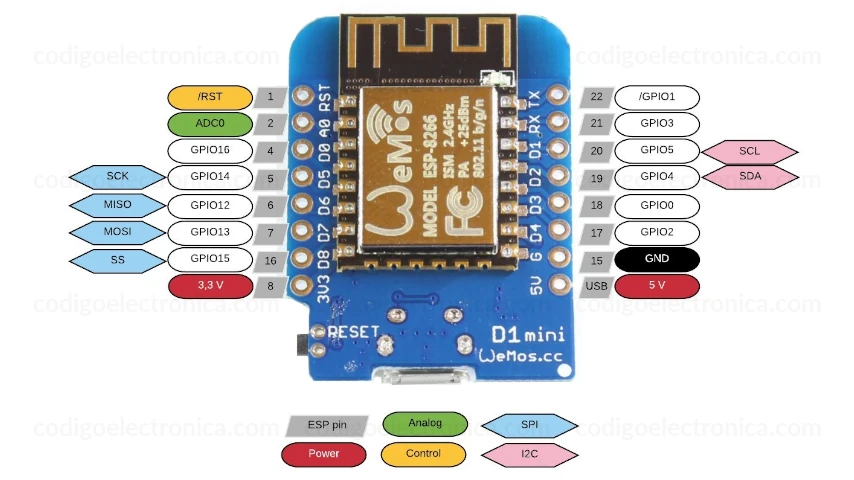
Wemos D1

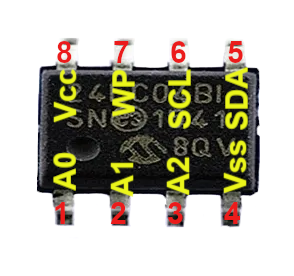
EEPROM 24LCXX
A continuación, mencionamos las principales características de las memorias EEPROM, para este post vamos a usar una memoria 24LC256, aunque si va a trabajar con otra memoria de la familia 24LCXX, la conexion es la misma.
📦 Materiales necesarios
| Componente | Cantidad |
|---|---|
| ESP32 | 1 |
| EEPROM 24LC256 | 1 |
| Resistencias 10kΩ (Pull-up) | 2 |
| Cables dupont | Varios |
| Protoboard |
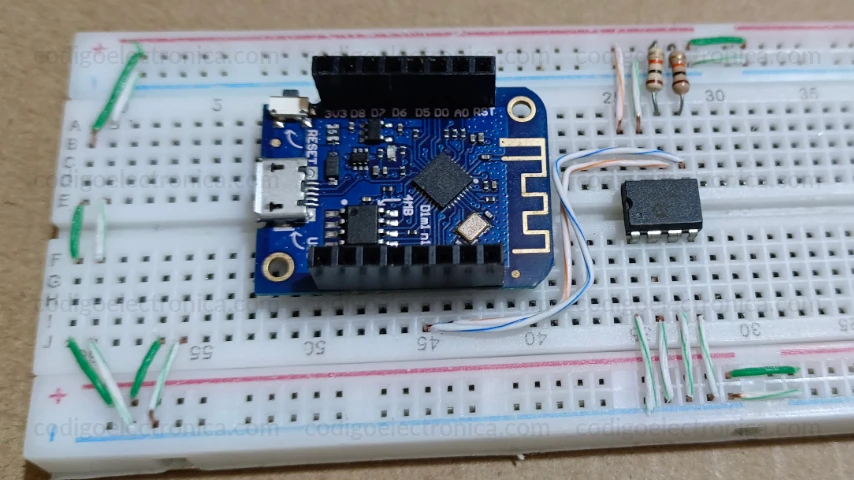
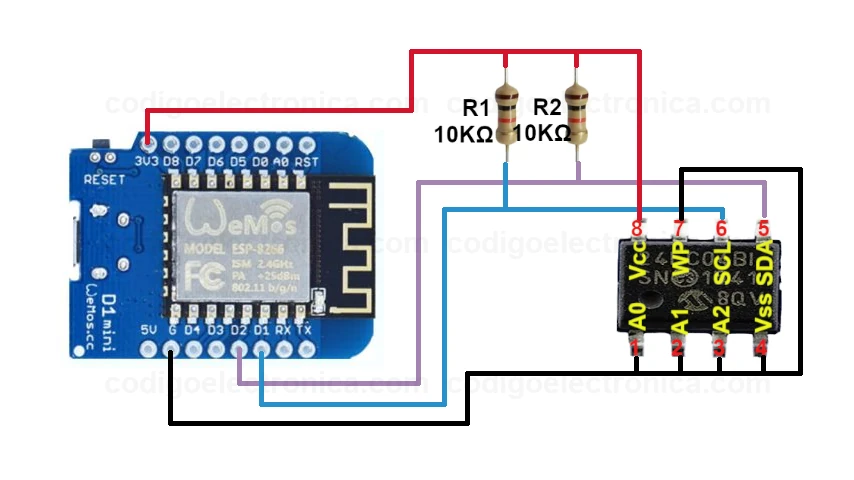
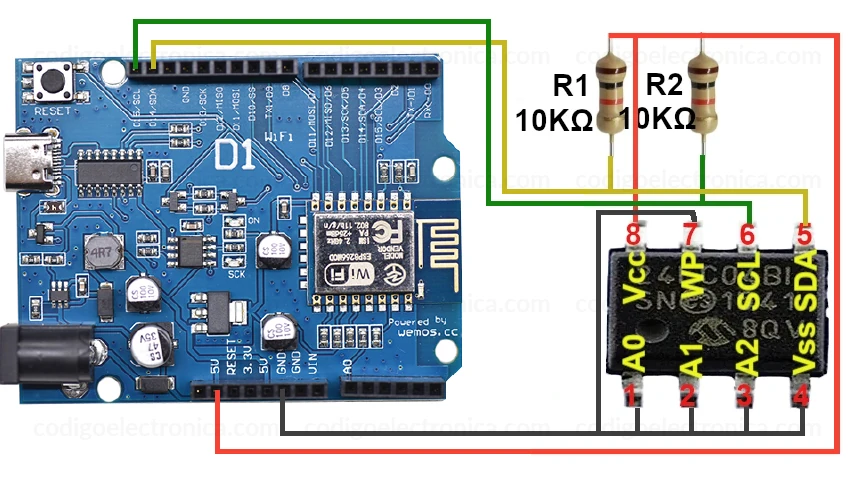
🔌 Conexión entre Wemos D1 Mini y EEPROM 24LC256
La 24LC256 se comunica mediante I²C, por lo tanto usaremos los pines SDA y SCL del Wemos D1 Mini.
| EEPROM 24LC256 | Wemos D1 Mini | Descripción |
|---|---|---|
| VCC | 3V3 | Alimentación 3.3V |
| GND | G | Tierra |
| SDA | D2 (GPIO4) | Datos I²C |
| SCL | D1 (GPIO5) | Reloj I²C |
| WP | GND | Desactivar protección contra escritura |
| A0, A1, A2 | GND (todos) | Dirección I²C = 0x50 |
⚠️ No olvides conectar resistencias pull-up de 10kΩ entre SDA y VCC, y entre SCL y VCC.
🧰 Instalación de la librería SparkFun_External_EEPROM
- Abre el Arduino IDE.
- Ve a Sketch > Include Library > Manage Libraries.
- Busca SparkFun_External_EEPROM (SparkFun_External_EEPROM).
- Instala la librería
💻 Código de ejemplo: Escribir y leer en la EEPROM
#include <Wire.h>

#include "SparkFun_External_EEPROM.h"
ExternalEEPROM myMem;

void setup()
{
  Serial.begin(115200);
  Serial.println("EEPROM example");

  Wire.begin();

  myMem.setMemoryType(512);

  if (myMem.begin() == false)
  {
    Serial.println("No memory detected. Freezing.");
    while (true)
      ;
  }
  Serial.println("Memory detected!");

  Serial.print("Mem size in bytes: ");
  Serial.println(myMem.length());

  byte myValue1 = 200;
  myMem.write(0, myValue1);

  byte myRead1 = myMem.read(0);
  Serial.print("I read (should be 200): ");
  Serial.println(myRead1);

  int myValue2 = -366;
  myMem.put(10, myValue2);
  int myRead2;
  myMem.get(10, myRead2);
  Serial.print("I read (should be -366): ");
  Serial.println(myRead2);

  float myValue3 = -7.35;
  myMem.put(20, myValue3);
  float myRead3;
  myMem.get(20, myRead3);
  Serial.print("I read (should be -7.35): ");
  Serial.println(myRead3);

  String myString = "Hi, I am just a simple test string";
  unsigned long nextEEPROMLocation = myMem.putString(30, myString);
  String myRead4 = "";
  myMem.getString(30, myRead4);
  Serial.print("I read: ");
  Serial.println(myRead4);
  Serial.print("Next available EEPROM location: ");
  Serial.println(nextEEPROMLocation);
}

void loop()
{
}
🔍 Explicación del código
- Inclusión de Librerías
Wire.h: Librería estándar para comunicación I2C.SparkFun_External_EEPROM.h: Librería de SparkFun que facilita la lectura y escritura de EEPROM externas por I2C.- Crea un objeto
myMemque representa la memoria EEPROM externa.ExternalEEPROM myMem;
- Inicio del Programa
- Inicia la comunicación serial para monitorear desde el monitor serie.
Serial.begin(115200); - Inicia la comunicación serial para monitorear desde el monitor serie. Wire.begin();
- Inicia el bus I2C del ESP32. myMem.setMemoryType(512);
- Define el tipo de EEPROM como una 24LC512 (512 kbits = 64 KB).
- Inicia la comunicación serial para monitorear desde el monitor serie.
- Verificación de la EEPROM
begin()intenta comunicarse con la EEPROM.- Si no puede, entra en un bucle infinito (el programa se detiene).
- Si se detecta la EEPROM, continúa la ejecución.
- Muestra la cantidad de bytes disponibles en la EEPROM (en este caso, 65536).
- Escritura y Lectura de Datos
- Guarda el byte
200en la posición0. - Luego lo lee desde la misma posición.
- Guarda el byte
✍️ Escritura y Lectura de Datos
✅ Escribir/Leer un byte:
- Guarda el byte
200en la posición0. - Luego lo lee desde la misma posición.
✅ Escribir/Leer un int:
int myValue2 = -366;
myMem.put(10, myValue2);
int myRead2;
myMem.get(10, myRead2);
Serial.print("I read (should be -366): ");
Serial.println(myRead2);
put()guarda un tipo de dato complejo (en este caso, unint) en la posición10.get()lo recupera desde esa posición.
Usa internamente memcpy() para dividirlo en bytes y almacenarlo.
✅ Escribir/Leer un float:
float myValue3 = -7.35;
myMem.put(20, myValue3);
float myRead3;
myMem.get(20, myRead3);
Serial.print("I read (should be -7.35): ");
Serial.println(myRead3);
-
Mismo mecanismo que el anterior pero con un
float.
✅ Escribir/Leer una String:
- Guarda una cadena de texto en la EEPROM a partir de la posición
30. putString()también devuelve la próxima posición libre.- Luego,
getString()recupera la cadena almacenada.
🧪 Verificando funcionamiento
- Conecta tu ESP32 y sube el código.
- Abre el monitor serial a 115200 baudios.
- Deberías ver el mensaje:
Memory detected!
Mem size in bytes: 65536
I read (should be 200): 200
I read (should be -366): -366
I read (should be -7.35): -7.35
I read: Hi, I am just a simple test string
Next available EEPROM location: 65